

Before you start
- An HTTPS endpoint that accepts
POSTrequests and answers with a2xxwithin 10 seconds. - Access to the Bindbee dashboard. Admins and Members can both manage webhooks - see Roles and permissions.
Steps
1
Open the Add Webhook form
Go to Webhooks in the sidebar and click Add webhook.
2
Enter the destination URL
Type the URL after the fixed
https:// prefix. Click Send test event to confirm Bindbee can reach it.The check sends one HEAD request with no body, from the same network Bindbee delivers from.3
Choose the API version
Leave API Versions on Version 2 (2026.10.06), the one marked Recommended. The version can’t be changed once the webhook exists.
4
Name the webhook
Enter a Webhook Name that says what the endpoint does, for example
Employee sync. Names are unique in your organization, and the name
identifies the webhook in delivery logs.5
Choose the environments
Under Webhook Type, tick Production, Development, or both. The
webhook fires only for connectors in the environments you tick - see
Environments.
6
Select events
Events are grouped into Connector changes and Data model changes, which has one group per category, such as HRIS Data Model.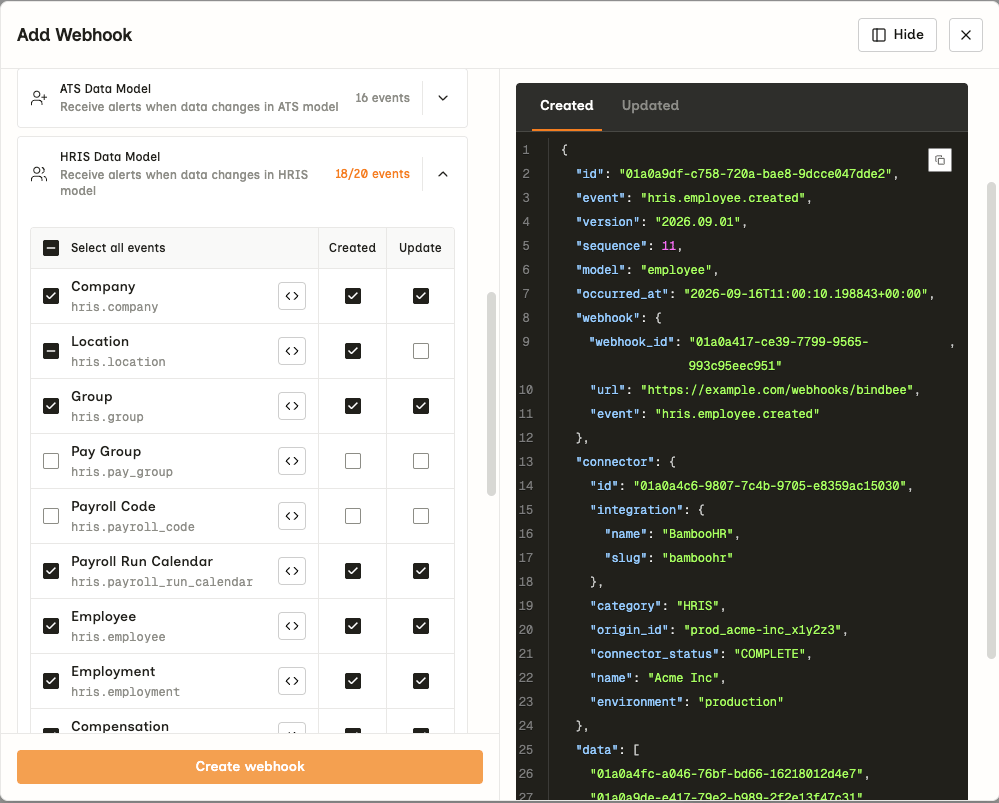
- Tick an event, or tick Select all events to take a whole group.
- In a data model group, tick a model’s row for both its created and updated events, or tick the Created or Update column alone.
- Click the code icon beside an event to see a sample body in the Event Payload panel.
7
Create the webhook
Click Create webhook.
Frequently Asked Questions
Saving fails with "Url not allowed"
Saving fails with "Url not allowed"
Bindbee rejects public request-inspection services (
webhook.site, webhook-test.com), URL shorteners (bit.ly, t.co, tinyurl.com), and any address that resolves to a private network. Use your own endpoint, or a tunnel to one while you develop.Send test event says "Invalid URL"
Send test event says "Invalid URL"
Your endpoint either answered
HEAD with a 5xx, or Bindbee got no response
at all: DNS, TLS, a refused connection or a timeout. Check the endpoint is
publicly reachable over HTTPS, then try again.The webhook exists but nothing arrives
The webhook exists but nothing arrives
Check these, in order:
- Enable is on for the webhook.
- The connector’s environment is one the webhook covers. A Development connector never triggers a Production-only webhook.
- The event matches the connector’s category. An
ats.*event never fires for an HRIS connector. - A data event fires only when a sync created or updated records of that model. A sync with no changes sends only
connector.sync.startedandconnector.sync.completed.
Change the URL or the events
Change the URL or the events
Open the webhook and click Edit. You can change the name, URL,
environments and events. Saving replaces the event list with exactly what is
ticked.
Move a webhook to a different version
Move a webhook to a different version
Create a new webhook on the version you want. The same URL can be registered
under both versions while you switch - see Migrate from version
1.
Pause or delete a webhook
Pause or delete a webhook
To pause it, switch Enable off on the webhook’s page or in the list. Nothing is queued while it’s off, so events from that period are never sent.To delete it, open Settings on the webhook’s page and click Delete webhook under Danger zone. Deletion can’t be undone.
Related
- Webhook events - what each event means before you subscribe
- Verify webhook signatures - the next step for your endpoint
- Delivery and retries - what your endpoint should return, and when Bindbee retries
- Environments - why Production and Development connectors trigger different webhooks